Sunday, 13 December 2015

Linux basics: How To Reset Forgotten Password In Ubuntu

We have already showed you how to reset a forgotten password in CentOS. In this brief tutorial, we will see how to reset the lost or forgotten password in Ubuntu and derivatives.
Here, we will reset the lost/forgotten password of Ubuntu 14.10 server.
Power on the system. You should see the grub menu when booting your system.
Ubuntu 14.10 server [Running] - Oracle VM VirtualBox_007
Press “e” to edit the grub menu. The following screen should appear.
Ubuntu 14.10 server [Running] - Oracle VM VirtualBox_008
Find the line that starts with: linux     /boot/vmlinuz….
Ubuntu 14.10 server [Running] - Oracle VM VirtualBox_009
Go to the end of the line and type: init=/bin/bash
Ubuntu 14.10 server [Running] - Oracle VM VirtualBox_010
Now, press CTRL+X or F10 to boot your Ubuntu system.
Once you reached the bash prompt, type the following commands to mount the file system in rw mode.
mount -o remount,rw /
Now, change the password using command:
passwd
The above command will reset your root user password. If you want to change the password of a specific user, for example sk, use the following command instead.
passwd sk
Reboot your system.
reboot -f
That’s it. Now, you can login using your new password.
Please don't forget to check out www.hackerbhai.com

TimeShift: Restore Your Linux Desktop To Previous State

Have you ever had a situation or ever wanted to restore your Linux desktop to previous state? Windows has an excellent utility called System Restore to restore the system to previous state, but Linux doesn’t has any native application to do that. No worries, today i came up with application called TimeShift.
TimeShift is a application that provides functionality similar to the System Restore feature in Windows and the Time Machinetool in Mac OS. TimeShift protects your system by taking incremental snapshots of the file system at regular intervals. These snapshots can be restored later to bring your system to the exact state it was in at the time when the snapshot was taken.
TimeShift is something similar to applications like rsnapshot, BackInTime and TimeVault but with different goals. TimeShift is designed to protect only system files and settings. User files such as documents, pictures and music are excluded.
Install TimeShift On Ubuntu 15.10/15.04/14.10/14.04
Add the TimeShift PPA with command:
$ sudo apt-add-repository -y ppa:teejee2008/ppa
Update the package lists using command:
$ sudo apt-get update
Now Install TimeShift using following command:
$ sudo apt-get install timeshift
Install TimeShift On other Linux distributions
Currently TimeShift packages are available only for Ubuntu based systems, but also the developer has developed packages for other distributions.
Before installing TimeShift, you should install the following packages depending upon your distribution.
libgtk-3 libgee2 libsoup libjson-glib rsync
Download the TimeShift packages for other distributions from the following links.
After downloading the TimeShift, install it using the following command.
Install TimeShift 32bit:
# chmod +x timeshift-latest-i386.run
# sh ./timeshift-latest-i386.run
Install TimeShift 64 bit:
# chmod +x timeshift-latest-amd64.run
# sh ./timeshift-latest-amd64.run
Launch TimeShift
Launch TimeShift either from Menu or Dash. At first launch, the application will estimate the system size for snapshot.
Create Restore point
Click Backup on the Menu bar and  take first snapshot of your system.
TimeShift v1.3.1 by Tony George (teejeetech.blogspot.in)_001After taking the first snapshot, you can schedule for automatic snapshots on a particular interval. To do that go to Settingssection, enable Scheduled Snapshots and set the backup levels such as hourly, daily, weekly, monthly, boot etc.
Settings_003The Snapshots will be saved on /timeshift location. TimeShift will run at 30 minute regular intervals and take backups only when needed.
After completing the first snapshot, you will have a following like screen.
TimeShift v1.3.1 by Tony George (teejeetech.blogspot.in)_002The Snapshots will be saved with exact date and time when the backup has been taken.
System Restore
You can restore Snapshots either from the running system or live cd. Restoring backups from a live system requires a reboot to complete the restore process. If your system broken or doesn’t boot in case, you can use the live cd to restore the system to a previous working state.
To restore your system to earlier state, click on the Restore button and select the snapshot.
Restore_004Also if you want to exclude some applications from being restored, you can have the option to exclude them.
Restore_005Cross platform restoration is also possible. For example, currently you are using Ubuntu 13.10 and want to try out Linux Mint 16 for a week. After one week you can switch to your old distribution Ubuntu 13.10. Please note that since installing new distributions formats root partition, so you should move the /timeshift folder to new partition.
I hope this application will help you sometimes if something went wrong on your Linux desktop. You don’t need to reinstall your system, you simply can restore your system to a previous working state without much effort using TimeShift.
Please don't forget to check out www.hackerbhai.com

Systemback: Restore Your Linux System To Previous State

A couple of months ago, i have described an awesome tool called TimeShift that can be used to restore your Linux desktop to the previous working state in Unixmen. In the same series, today I introduce a new tool named systemback.
Systemback is an open source, system backup and restore application. Using Systemback, we can easily create backups of system and users configuration files. In case of problems, we can easily restore the previous state of the system. There are extra features like system copying, system installation and Live system creation.

Features

Systemback includes the following features:
  • System backup
  • System restore
  • System copy
  • System install
  • Live system create
  • System repair
  • System upgrade

Install Systemback On Ubuntu 15.10

Currently, Systemback is available only for ubuntu based systems. On Ubuntu and it’s derivatives, we can easily install it via PPA. Run the following command sequences to install Systemback on your Ubuntu system
sudo add-apt-repository ppa:nemh/systemback
sudo apt-get update
sudo apt-get install systemback

Usage

Create System Restore Point:
After installing it, launch Systemback app either from Dash or Menu.
Initially, there is no system restore point. So, let us create a new system restore point by clicking on the Create New button which is found under the Point Operations section.
Now, the Systemback will create a new restore point for your system.
After creating the restore point, the backup will be stored in the /home/systemback/ folder. You can change the location from the Storage directory option on the top right corner of the Systemback main window. Also, the successfully created system restore points will be shown on the top left corner of the main interface.
Restore the system to previous state:
Restoring to the previous state is as simple as creating restore point. Open up the Systemback main window, select any one of the system restore point, and hit the button System Restore under the Function Menu.
You’ll be asked whether you want to do a full restore, system files restore, or just user(s) configuration files only. Select the option accordingly and hit the Next button.
Finally, click Start button to restore your system to previous working state.
System Copy:
Using System Copy feature, we can easily copy the files from one partition to another and vice versa. Use this feature with caution. Else, you’ll be ended up with data loss.
System Install:
This option will let you to create a new user with password of your choice. Also, you can change your system root user password if you want to.
Live System Create:
This is one of cool and notable feature of Systemback. Unlike other system backup and restore tools, Systemback will let you to create a live CD/DVD of your current system with or without the users data files. Later, you can use this Live CD/DVD on other system, also you can install it if you want.
After creating live system, convert it to ISO, and boot the ISO using CD/DVD or USB thumb drive.
System Repair:
Like System Restore, this option will help you to fix your Linux desktop in case of any problems. Don’t touch this option, unless you know what you’re doing.
System Upgrade:
Using this option, you can upgrade your Linux system to the most recent version.
Exclude:
If you don’t want to include a file or folder in your restore points, you can use this feature.

Removing Systemback

If you not happy, or doesn’t have necessity to keep it on your system, you can remove this software as shown below. But, I guess, this tool will definitely be an useful tool in your arsenal.
sudo apt-get purge systemback
For me, Systemback is doing the good job as it advertised, and has many additional features among other system backup and restore tools. Give it a try, you won’t be disappointed.
Please don't forget to check out www.hackerbhai.com

Downloading Made Easy And Fast With Apt-Proz And ProZilla

So you’re using Ubuntu or Ubuntu derivatives and want to install/update/upgrade packages, what are you going to do? The answer is very simple and we all know the answer: apt-get. We can install packages using command: apt-get install <package-name>, update packages with command: apt-get update, or upgrade using command: apt-get upgrade. This is the default and traditional method of Ubuntu.
Suppose if you’re not happy with the speed of apt-get, you can use apt-fast instead. Apt-fast is simple shell script that increases the apt-get and aptitude download speed. For more details check out my previous tutorial about apt-fast here.
Well, today we will see some other tool called apt-proz that can be used to speed up the download speed of apt-get. apt-proz is a shell script similar to apt-fast that increases the download speed of apt-get and aptitude by many times(atleast for the developer!). While apt-fast uses Axel or aria2c download manager, apt-proz uses ProZilla download accelerator instead.
ProZilla is a full featured command line download accelerator for Linux operating systems. It downloads a files by splitting into multiple pieces and downloads them simultaneously form multiple connections. It supports pause/resume, http/ftp protocols.
ProZilla Features
– Supports FTP.
– Supports HTTP including redirection.
– Proxy servers supported.
– Resume Supported.
– Improved error checking and correction.
– Complete acceleration: The file will be downloaded as fast as possible as your bandwidth allows.
– FTP passwords can be specified with the URL, or can be obtained automatically from the .netrc if it exists.
– The number of connections that prozilla uses can be changed.
Install ProZilla and Apt-proz on Ubuntu / Linux Mint
We can install the ProZilla and Apt-Proz on Ubuntu and its derivatives using PPA as shown below.
$ sudo add-apt-repository ppa:tahutek-team/prozilla
$ sudo apt-get update
$ sudo apt-get install prozilla apt-proz
If you encounter with an conflicting error that says: “locale.alias”, you can resolve this error as by manually installing the deb file as shown below:
$ cd /var/cache/apt/archives/
$ sudo dpkg -i --force-overwrite prozilla*.deb
$ sudo apt-get install -f
ProZilla Usage
Let us how to use ProZilla.
Syntax:
$ proz <options> <download-url>
Example:
I am going to download Ubuntu 13.10 ISO using Prozilla, so the command would be:
$ proz http://releases.ubuntu.com/saucy/ubuntu-13.10-desktop-amd64.iso
To resume the download use ‘r’ flag.
$ proz -r http://releases.ubuntu.com/saucy/ubuntu-13.10-desktop-amd64.iso
To limit the download speed in bits, use argument –max-bps as shown below.
$ proz --max-bps=51200 http://releases.ubuntu.com/saucy/ubuntu-13.10-desktop-amd64.iso
For more detailed usage, enter the following command in Terminal:
$ proz --help
Apt-proz Usage
Apt-proz usage is fairly simple and similar to apt-get usage. We can use this as the way we use apt-get command.
To install a package, hit the following command:
$ sudo apt-proz install <package-name>
To update system:
$ sudo apt-proz update
To upgrade system:
$ sudo apt-proz upgrade
For more details, refer the man pages.
$ man prozilla

Please don't forget to check out www.hackerbhai.com

apt-fast: Improve apt-get Download Speed

apt-fast is a “shell script wrapper” for apt-get and aptitude that can drastically improve APT download times by downloading packages with multiple connections per package. apt-fast uses aria2c or axel download managers to speed up the APT download time. Just like the traditional apt-get package manager, apt-fast supports almost all apt-get functions such as install,remove, update, upgrade, dist-upgrade etc. And one more notable feature is it supports proxy too.
Install apt-fast On Ubuntu
Use the following PPA to install apt-fast. apt-fast developer says “Some distros, such as PCLinuxOS include apt-fast in their default repos”.
To Add apt-fast PPA, enter the following command in Terminal.
sudo add-apt-repository ppa:apt-fast/stable
Update the sources list with command:
sudo apt-get update
Now install it using command:
sudo apt-get install apt-fast
During installation it will ask you to select the maximum number connections to download packages.
sk@sk: ~_003Select No and continue installation. If you select Yes, apt-get won’t ask you the confirmation during any package installation.
sk@sk: ~_004I found aria2 download manager has been installed along with apt-fast installation automatically. So you don’t have to install it separately.
If you want re-configure apt-fast options, you can do it using command:
sudo dpkg-reconfigure apt-fast
Usage
Similar to apt-get functions, we can use:
apt-fast install package
apt-fast remove package
apt-fast update
apt-fast upgrade
apt-fast dist-upgrade
and more.
apt-fast package manager in action:
sk@sk: ~_005Create alias (Optional)
Edit ~/.bashrc file and add the following line at the end.
alias apt-get='apt-fast'
Or simply run the following command to add it in your ~/.bashrc file.
sudo echo "alias apt-get='apt-fast'" >> ~/.bashrc
From now whenever you run apt-get command to install, remove, update and upgrade packages, it will use apt-fast automatically in the background. Sounds cool? Yes it should.
Please don't forget to check out www.hackerbhai.com

Aptik – Backup Your PPAs, Themes, Icons, And Application Settings In Ubuntu

Introduction

After upgrading or reinstalling a Ubuntu or Its derivatives, you have to install all applications, add PPAs, apply Themes, and adjus/change settings of applications. It is definitely a painful and time consuming task. Wouldn’t be better if it is possible to backup your favourite PPAs, themes/icons that you use now, and settings of Apps? So that, you can apply them later to your newly installed or upgraded system. Yes, It is a wise idea. This is where Aptik comes in handy.
Aptik is a tool that can be used to simplify the re-installation of packages after doing a clean installation of an Ubuntu-based distribution. It can be used while re-installing or upgrading to the next Ubuntu/Linux Mint release.

Installation

Add the Aptik PPA, and install it as shown.
sudo apt-add-repository -y ppa:teejee2008/ppa
sudo apt-get update
sudo apt-get install aptik

Usage

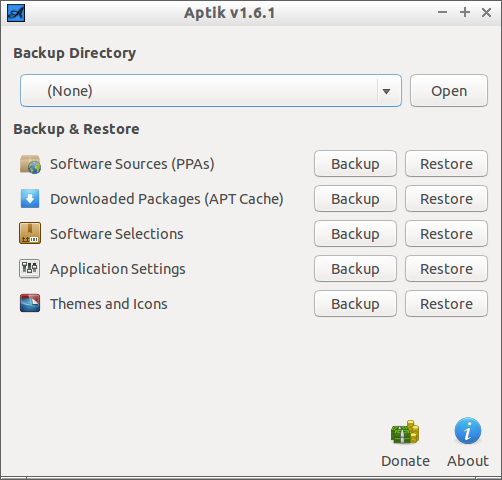
After installing Aptik, Launch it either from Menu or Dash. The Aptik default interface will look like below.
Aptik v1.6.1_001
As you see in the Aptik interface, you can do the following things.
  • Backup/Restore PPAs;
  • Backup/Restore downloaded packages(APT cache);
  • Backup/Restore Software selections;
  • Backup/Restore applications settings;
  • Backup/Restore Themes/Icons.
First of all, you have to create backup directory where you want to backup all of the above things. External or Usb drive might be the wise choice. Because, after doing clean installation, all files/folders will be gone, right? THat’s why we need a external USB drive to store the backup files.
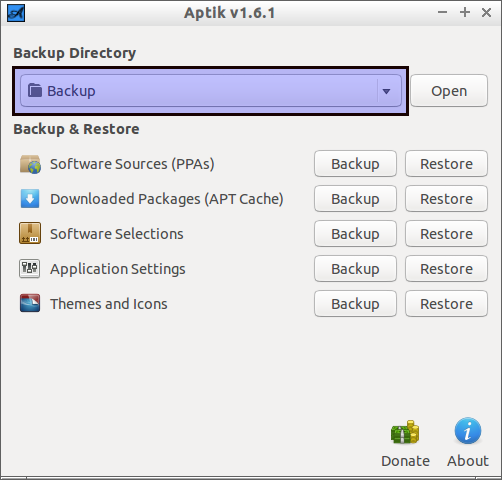
Or, you can simply use a local folder, and later you can transfer the local folder to your USB drive. The choice is yours. I will go with local folder to store the backups. Let us name the local folder as Backup, and this folder is created in the home directory.
Sp, select the backup directory now.
Aptik v1.6.1_002
Now, let me explore the tasks one by one.

Backup & Restore PPAs:

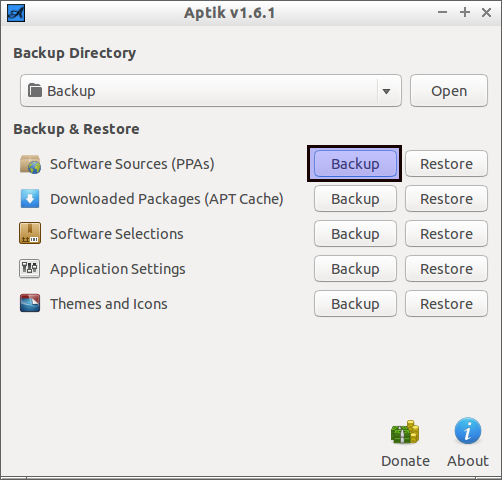
Click on the Backup button next to the Software Sources(PPAs) option,
Aptik v1.6.1_005
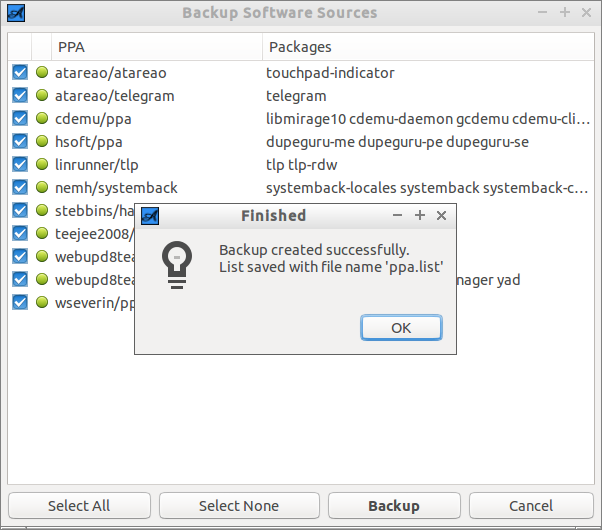
and select your desired PPAs that you want to backup, and hit the Backup button.
Backup Software Sources_004
Now, copy the Backup folder to any safe location, ex. USB thumb drive.
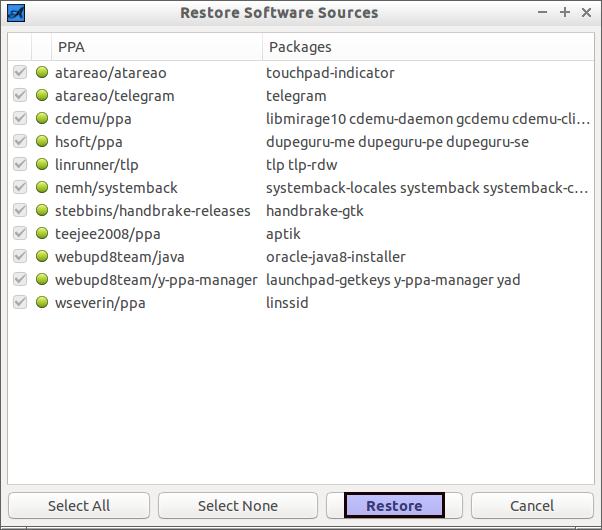
To restore the PPAs to your newly installed system, Insert the USB drive. Install and launch Aptik tool. Click the Restorebutton next to Software Sources button. Select the path of the backup folder. Then, select the PPAs you want to restore, and hit the  Restore button.
Restore Software Sources_006
Now, the PPAs will be restored to your newly installed system.

Backup & Restore APT Cache:

This option lets you to backup your downloaded packages(APT Cache) in your existing system. As said above, click on theBackup button next to Downloaded Packages (APT Cache) option.
Aptik v1.6.1_007
Be mindful that in case the system is upgraded to the next version, you may not be required to do this. Because, the new version will need latest applications.

Software Selections:

This option will backup all of your installed softwares on your system. As said above, click on the Backup button next to the Software Selections option. Select the installed softwares that you want to backup. Finally, hit the Backup button.
Backup Software Selections_009In case the system is upgraded to the next version, you may not be required to do this. Because, the new version will need latest applications too.

Application Settings:

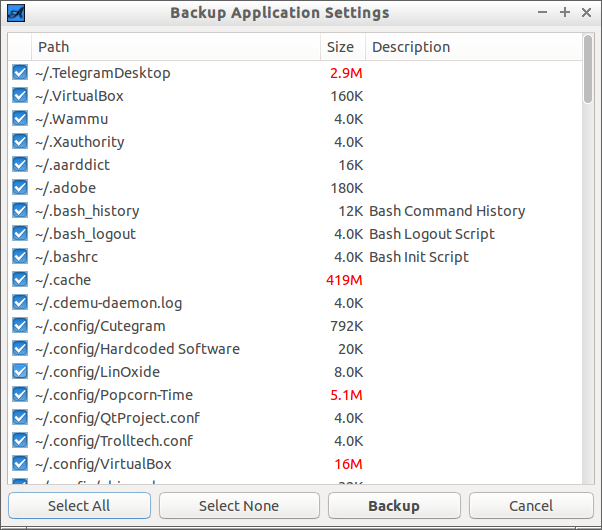
You can backup/restore the application settings using this option. Click on the Backup button, select the application settings of your choice, and hit the Backup button.
Backup Application Settings_011

Themes And Icons:

Some of us are very fond of fancy themes and Icons. If you want to keep the same themes or Icons after re-installing or upgrading your system, then this option will help you.
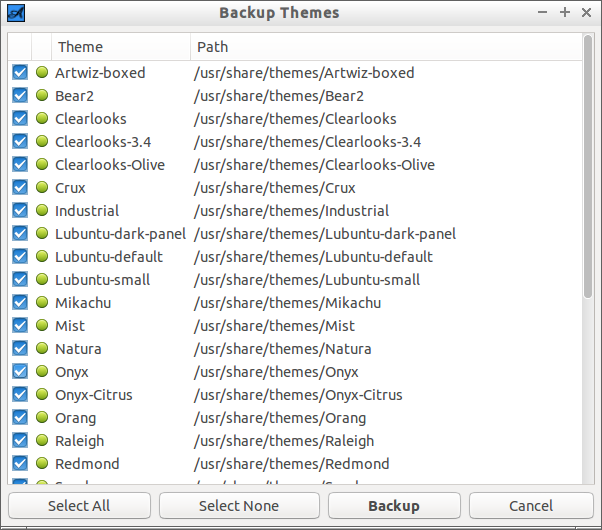
Similarly, click on the Backup button, select the themes of your choice, and finally hit the backup button.
Backup Themes_012
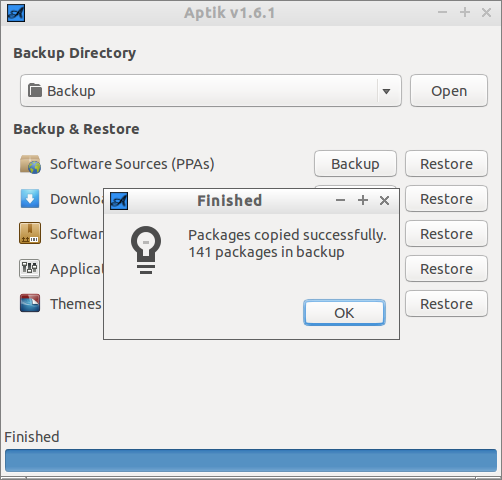
That’s it.
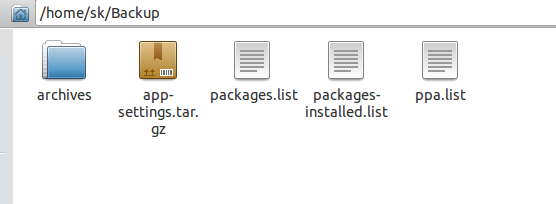
All packages, PPAs, settings will be stored in your backup folder.
Selection_013
You can safely move this folder to your external device, then re-install or upgrade the system. And, restore all backup things in minutes.

Conclusion

Aptik is a decent, simple tool to help you to make your life easier. While it won’t eliminate all the work that needs to be done after a fresh installation, it will reduce it greatly. And, you can save plenty of time too.
Please don't forget to check out www.hackerbhai.com

App Grid: A New Alternative For Ubuntu Software Center

App Grid is a light weight alternative for Ubuntu Software Center. It allows you to filter applications by installed, pending, categories, name and rating. It is released under proprietary license and is available for Ubuntu 14.04, 14.10, 15.04, 15.10. The green circle around the applications denotes that those are currently installed. Also it offers a Ubuntu single sign-in option, so that users who have purchased applications with Ubuntu-one account can also install the same with App Grid.
Features
– discover new apps every time you open App Grid,
– search, filter and sort to find exactly what you’re looking for,
– make informed decisions with our extensive detail views,
– sign in with your Ubuntu One account to review and purchase apps.
Comparisons between App Grid and the Software Center
– python3 vs python2,
– warm start to home screen is 2.7s vs 20s,
– warm start to details screen (eg opening an apt: link) is 2.3s vs 30s,
– full database build is 58s vs 6min24,
– initial database size is 36.7mb vs 96.5mb,
– memory usage after startup to home screen is 20mb vs 53.6mb,
– lines of code is somewhere around 5900 loc vs 56960 loc (incl tests etc).
Install App Grid On Ubuntu 15.10
Add the App Grid PPA with command:
$ sudo add-apt-repository -y ppa:appgrid/stable
Update packages list with command:
$ sudo apt-get update
Now install App Grid using the following command.
$ sudo apt-get install appgrid
Launch App Grid
Open it up either from Dash or Menu. The default interface will look like below.
App Grid_017Select the application you want to install. You can use the Search box  to find any software. Also there are many categories on the right side that helps to find out the relevant softwares.
App Grid_018I find it much faster than Ubuntu Software center. Why don’t you give it a try?
Please don't forget to check out www.hackerbhai.com